

Welcome to the final week of our Master Bathroom One Room Challenge™. Happy Haute Home joined this Spring as a Guest Participant. This event is a widely anticipated biannual event every April and October. Each round, twenty design bloggers take the challenge and transform a space.Every Wednesday, the designers document their process while sharing their sources and professional advice over six weekly posts. This amazing challenge is hosted by Linda at Calling it Home.
If you missed my prior posts on our master bathroom renovation challenge, you can catch up here to see our progress each week.
Week 1/Week 2/Week 3/Week 4/Week 5
What a remarkable renovation process it has been! My contractors have been steadily working and have not fallen behind on the timeline. It really pays to have good people and good relationships with your contractors, and I am happy to report we had a great experience with this project. It is also important to have a well thought out plan, to have your contractors lined up and a budget before you begin your project.
As far as cost for this project, we came in well under our $35,000 budget. What made the greatest difference in cost and saved us a ton of cash was that I was the project manager of our renovation. I designed the space and I bought most of the materials, which saved us from pricey markups. We didn’t pay a company to manage the project, I did all the leg work. I found the contractors for our job including tile installer, electrician, plumber, drywaller and painter. My tile installer is really great, he received a discount on the materials through the tile company, and he passed that discount onto me, which saved thousands.
Shopping around for contractors takes time, but getting a few different quotes will help you in the long run. I shopped around for my plumber and got a discount when I told him he was a referral. Don’t be shy to talk openly about your project and expectations, it will avoid conflicts in the future. As far as plumbing goes, I suggest you talk to your plumber regarding all the materials needed such as supply lines, diverters, valves and such. I relied on their expertise to guide me to the right products, most of which I ordered myself.
I also rented a dumpster for the disposal of all the old bathroom products. Dumpster rental is so easy, one phone call – they drop off an empty dumpster and pick up when full.
It’s also important to do cost comparisons between products and companies. Our shower glass enclosure and door was a big ticket item, and prices varied greatly between glass companies. But spending time to do the research paid off in the end.
There are obviously pros and cons of handling a large renovation on your own without the help of a middleman, but I felt I had the experience to take on this big project and I would do again in a heartbeat.
Let’s look through the before pictures of our bathroom.


Our remodeling plan for the bathroom consisted of the following:
- Shower
- Replace all tiles inside the shower
- Add tiles on the outside of the shower walls
- Add a rain head shower system
- Replace existing shower heads
- Add shower nooks
- Replace glass door and surround with chrome rims and increase height of walls and door
- Add a stone floor to the shower
- Vanities
- Paint cabinets
- Add granite countertops with double ogee edge
- Add backsplash to the vanity walls
- Add custom framed mirrors to the space above the vanities
- Replace sink faucets
- Water Closets (2)
- Replace both toilets
- Add white plantation shutters to windows
- Lighting
- Replace lighting over vanities
- Add Pendant over bathtub
- Replace all tiles on bathroom floor
- Paint the bathroom walls, ceiling and trim
- Hardware
- Replace vanity hardware with chrome knobs
- Add 2 square towel rings near vanities
- Add 2 towel bars to outside of shower enclosure
- BathTub
- Replace built-in tub with free standing tub
- Add a free standing bathtub faucet
- Add 6 nooks with glass tiles to the side of the drywall surrounding the bathtub
- Add white plantation shutters to window above bathtub
Budgeted $35,000
Spent $27,000
- $18,000 on materials
- $9,000 on labor
These are the design boards I put together to help us visualize how all the materials would look together. 
 *Affiliate links are included for your convenience*
The granite we selected for our vanities is 3cm thick and called Blue Volga, it’s absolutely beautiful.
Are you ready for the Final Reveal?
The shower was completely redone using 12″ x 24″ tiles and we replaced the floor tiles with stones. A rain head shower system was added, and a hand held and fixed shower head were installed with chrome finishes. The shower enclosure and door was replaced using chrome finishes and increasing the height over the previous ones. 
Plantation shutters were added over the bathtub, and the vanities were painted white. A new backsplash along with white wood framed custom mirrors were added above the vanities. The wall lighting over the mirrors was also replaced with modern glass fixtures and two new American Standard toilets were replaced in the his and hers water closets.
We removed a large built in tub and replaced it with a sleek free standing bathtub and faucet. We also added 6 cut outs on the sides of the walls and added white glass subway tiles perfect for candles and adding ambiance to the space. A new pendant over the bathtub will cast the perfect light (unfortunately it didn’t arrive in time for the picture).
Towel bars were added to the outside of the shower, and charcoal floor tiles in 12″ x 24″ were installed on the main area of the bathroom floor. The picture below is “her” side of the bathroom.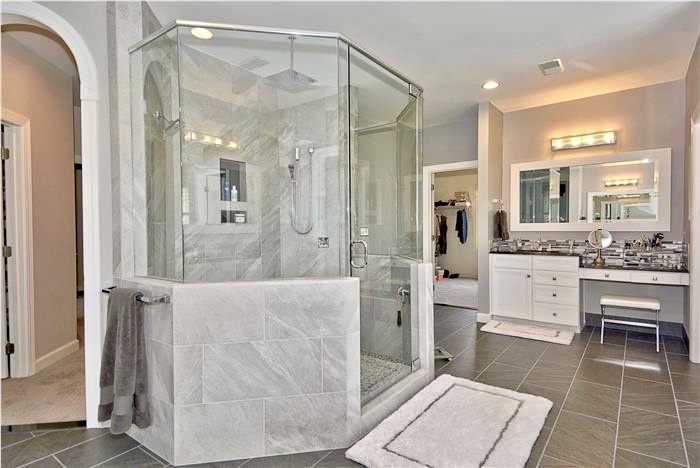
This is a view of my husband’s side of the bathroom featuring all new chrome hardware on the cabinets, new faucet, towel ring, and new granite countertops.
The room was painted in Benjamin Moore paint – color Gray Owl. The floor mats and the towels are from Frontgate.
As I mentioned earlier, in order to save money on this project, I ordered all the items myself, mostly from Amazon and found some wonderful deals. Check out the product links below for some great finds.
1)10 inch Rain head Shower/ 2)Shower Head/ 3)Handheld Shower/ 4)Conway Pendant/5)Free Standing Bathtub/ 6)Glass Overhead Lighting/ 7)Backsplash tiles/ 8)Sink Faucet (8 inches) 9)Towel Ring/ 10)Freestanding Bathtub Faucet/ 11)Toilet/ 12)Toilet Holder/ 13)Towel Bar (24″)
We couldn’t be happier with our renovation and our timeline. Planning was a big part of our project and spending the time to prepare and shop around made all the difference.
I’d love to hear from you, drop me a line. Thanks for stopping by and I hope I inspired you to take on a home renovation project of your own.


Wow Denise I love your new bathroom!!!
Thank You Julia! I appreciate your comment!
Looks incredible!!!! Love it!!
Thank You Valerie!
What a humongous space – I’m amazed at all the changes 🙂
Thanks Nicole, it was an enormous project and fun to put all together.
Beautiful! Thanks so much for all your practical advice. It was fun seeing the process. I hope you enjoy many years in your beautiful space! 🙂
Thank You Lynne! How very sweet of you to comment 🙂
Turned out gorgeous
Thank you, we were very happy with the results. Appreciate you visiting!