
Have you ever stood in a room in your house and stared at the walls? I’ll admit that I do from time to time. Not because I’m crazy….but because I’m trying to decide what can I do give this room some personality!
Changing the wall color is an easy and inexpensive way to get a big bang for your buck. Adding a statement wall is another way to give a “big” personality to your room. One way to do this is by using paint, such as painted stripes for a statement wall that I discussed in a prior post (HERE).
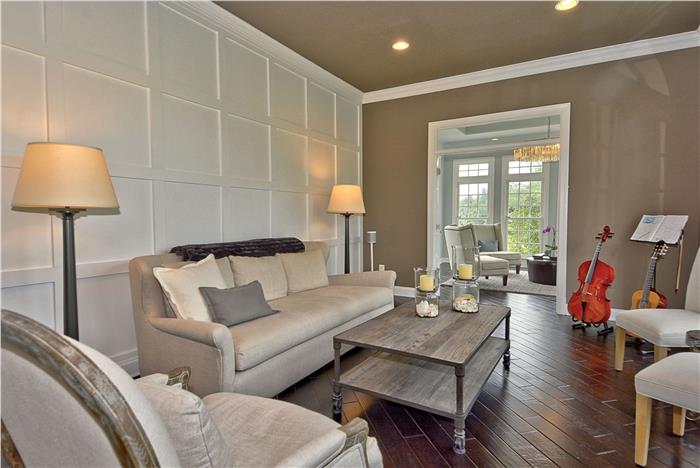
If you have been following my posts, you know I love Board and Batten Wainscoting. You can check out one of my many articles about Board and Batten styling (HERE).
When I was designing my living room, I wanted to try something I had never done before, a statement wall using Board and Batten. When deciding on a statement wall, my suggestion is to choose a wall that doesn’t have any widows, doors, or closets. In other words, you want a completely clean wall. You want this wall to be the focal point of the room, and don’t want any windows or doors interfering with the look. For my living room project, the wall was easy to decide on, it was the only blank wall in the room.
A statement wall is one wall of your room. If you have a room with 3 blank walls and can’t decide which to choose, such as a bedroom, I would choose the wall that the bed will rest against…that’s my personal preference.
The first step in designing your Board and Batten wall is to carefully measure your wall space. Measure, measure, measure. Measure twice, cut once. The size of your boxes will be determined by the height and width of your wall. You want to have symmetrical boxes, so carefully measure the width and height of the wall, and determine how many boxes you can put on the wall so they are all the same size.
Before we started the project, we removed the crown molding and the base molding. When installing wainscoting on a wall, my preference is always to remove existing crown and floor molding first. Once your Boards are up, you can put the crown back on the wall and on top of your Boards, it is a more professional look than just adding the Boards below your crown.
We framed out the 4 walls with 1″ x 4″ Boards and determined the size of the boxes from there. Remember, measure twice cut once.
The statement wall turned out beautifully and I was thrilled with the results! The other 3 walls were painted a dark brown and the statement wall really stood out in the room.
I often get asked about my living room furniture. I love this furniture because it’s comfortable and yet elegant. The sofa is a neutral color and the coffee table is a rustic piece of furniture, very modern farmhouse style. If you are interested in shopping the look, I have attached a few links below of similar looking products. Joss and Main has very reasonably priced furniture and accessories.
*Post contains affiliate links*


